I wanted to use as much of the wood I already had as possible, and sometimes that includes gluing pieces together. I used some left over pieces from the feet so I glued it up to make the top stretchers that will support the bench top.

When edge jointing boards using a hand plane, you can put them face to face and plane them. This will help to make the joint fit better so even if it's not perfectly square, there will be nearly no gap.

When gluing boards together it's important to have the boards fit as closely as possible. Some of the gap can be forcibly taken up by clamps, but the more clamping power you use, the higher the risk of the boards de laminating at some later point.

Since I'm using hand planes I can be fairly precise in adjusting the gap in boards.

Unfortunately I haven't figured out how to manage the glue squeeze out, so I have to use a chisel to clean off the dried glue.

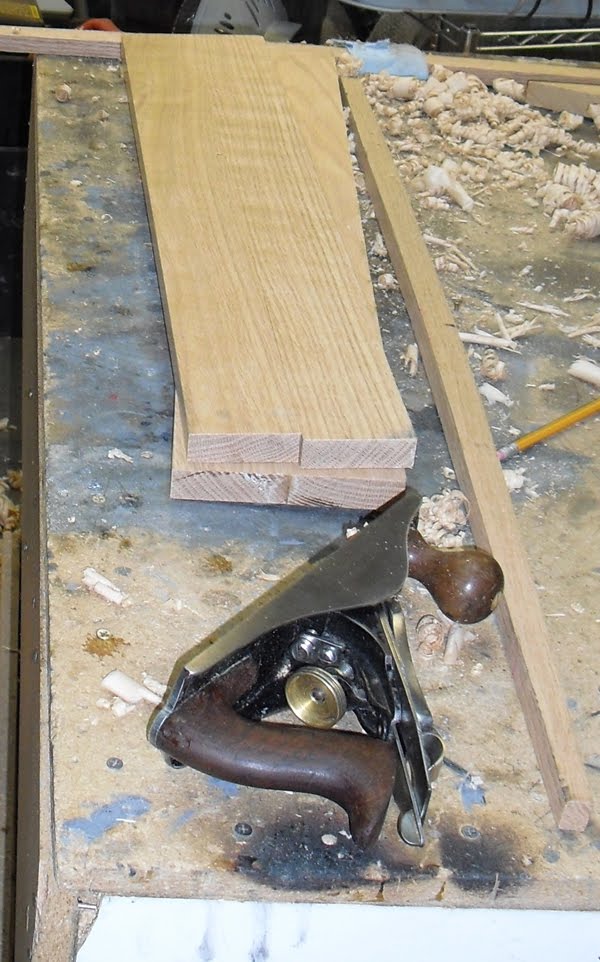
After a bit of work here's what the edge jointed boards looked like. You can see that they are beginning to smooth out a little.

Pretty well smoothed out now. I've read and also agree that a well sharpened a tuned hand plane will give a much smoother finish to wood than one could ever hope to get with sand paper.

Measuring out the next cut. I try and cut things about 1 inch longer than needed because the Radial Arm Saw I use isn't perfectly square and this gives me some fudge room. I have managed to get the Table Saw to be pretty accurate, but I still try and cut a quarter of an inch or so wider than needed so I can edge joint it to size. It's always easier to cut off than to cut on ;)

More boards to plane, and some of the shavings after planing.


In order to plane by hand, the board has to be immobilized. There are several ways to do this, one is a vise, the other is the use of bench dogs or battens (sticks of a sort that the board is forced against). Bench dogs can be made of metals or wood, and I wasn't sure which type I wanted to make, but after working on this bench I am seriously leaning toward using wood dogs. To hold the battens down that I have been using screws or nails to push the battens against. I hadn't put the screws or nails in far enough and during planing a particularly thin board I heard the heart dropping sound of metal against metal. Upon inspection this was the sight that greeted me.

If you look closely enough at the above picture, in about the center of the blade there is a spot where the blade met the screw head. Once a blade is in the correct shape it really only takes about 5 minutes to put a fine edge back on it, but a ding like this will take considerably longer. Needless to say I was much less than thrilled.
Here's the boards for the first foot ready to be drilled and then glued up.

I decided to build the top and legs out of Beech wood. Beech is pretty stable, about on par with Oak, but is less expensive. Oak runs about $3.95 a board foot (a board foot is 12inches by 12 inches by 1 inch thick) whereas Beech is about $3.00 BF. Beech is also commonly used in high end furniture for parts that aren't visible.
I bought 61 BF of 4/4 (pronounced Four Quarter, for whatever reason rough cut lumber is measured in quarters of an inch). Here it is before being chopped down to rough size, what a pretty sight.

After chopping the boards up for 4 legs and the rest for the top, I've stacked and sticker'd (the boards that separate one board from the one on top, this allows equal airflow around all the boards which will help to keep them from warping or twisting).

I realized the pipe clamps I already had were too few and too long. Most of them were between 4 and 5 feet long. Most of what I'd be gluing up is less than 6 inches and I needed quite a few clamps. I chopped down some of the pipes I already had and also bought a few more pipes. Here's one of the pipes clamped, ready to be cut down .

I used a Sawzall to do the cutting. To remove the bur that always happens when you cut metal by mechanical means (with a saw or by shearing) I used a fine file.

You remove the bur for two reasons. The main one, at least for me, was to keep it from shredding my skin when I used it. I get enough cuts, nicks, scrapes, scratches and splinters from places I don't expect, no reason to not prevent one I can predict. The second reason is it will make putting the bottom section of the pipe clamp on easier.
Planing hard woods like Oak and Beech takes a toll on blades, and they dull fairly quickly, at least they do for me. I had a few choices, I could buy more old blades, buy a new modern steel blade which is supposed stay sharp longer, or just interrupt my work to sharpen the blade every time the blade dulls. At $50 per blade, it seemed like a long shot to have this be worth doing, so I bought some used blades off eBay.

As you can see they were a bit rusty. Not really a big deal for me, just means more time to get them in usable condition. I disassembled the blades and used a wire wheel to clean off as much of the rust as possible.

It took a few hours to flatten the blades as well as sharpen them to a proper angle. I sharpen them to close to 25 degrees, which books would say is a bit much for working hardwood, but I've found it gives a fantastic finish and makes the blades easier to push through the board. If the blade is sharp enough, it can even be pushed against the grain with very little tear out. I've sharpened two of the three blades to usable condition.
I was at Woodcraft buying dowels I needed and as usual was looking at the other merchandise they have for sale. I was looking at the new blades and after speaking with the store representative I decided to buy one of the new blades and see if everything I read was true. It was only about $39 so it was a bit of an investment. It is thicker than the stock blades, as for how well it keeps an edge, I'm not totally sure if it's better or the same as the old blades.

It is pretty and shiny. It really didn't take a lot to get it into working order. Even though the blade is sharp out of the package, you still have to flatten and sharpen it more. So a few minutes of sharpening and it was ready to try out.

I'm still deciding if it was worth it or not, but thus far it seems to stay sharp longer than the stock blades. I've put 3 blades through the small plane while only using the new blade in the longer plane. I'll have to keep using it for a while longer before I determine if I really want to buy another one for the smaller plane, but so far it looks like I probably will.
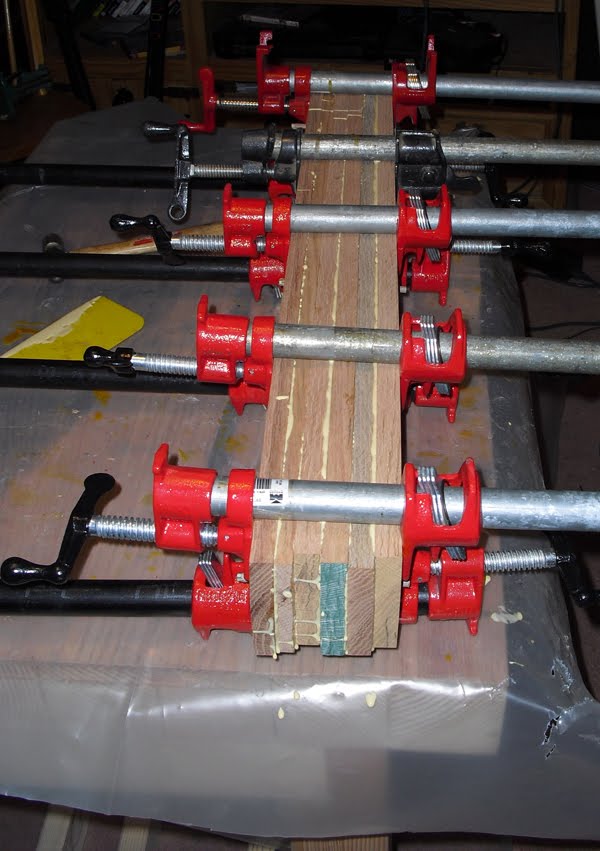
Here's what the two top stretchers look like now that they are glued up. Contrary to popular belief, the dowels that go through the boards do not add to the strength of the joint. Known as Dowel Pinning, dowels are used only to line up joints. In my bench I'm using them to prevent the boards from winding when I glue and clamp them. Winding is where you start to tighten the clamps down and the boards start to slide around like a paper fan unwinding. I chose to use Walnut wood since it contrasts with the Walnut and Beech so well. It was more of a decorative choice than anything else.


Here's one of the legs glued up.

Here's the last foot glued up. This is the last piece of the base that needs to be glued up.


 There's many ways to remove dried glue. I used the chisel to get the majority of it off before using my jointer plane to roughly square the boards. One thing I've learned is that excess glue dulls the plane blades much faster than otherwise necessary. I'll have to decide on a way to remove the excess glue before it gets hard.
 One of the legs after removing the glue from one side.
 Using a straightedge to check how flat the side is. As you can see, the side is pretty flat.
 I use a mortiseing scribe to get the boards as close to dimensionally the same as I'm able. I'm not perfect, but I'm getting the boards to within at least 1/32 of an inch of the same size, and for now I think that is fine.
 If you look closely on the upper edge of the board, you will see the one of the scribe lines.
 Both legs I finished today. I like the contrasting walnut dowel. I have a feeling I'll use something like this when I do the furniture.
 More pics of the two legs.
 A pic with one leg on its side. You can see the laminated boards.
 The shavings from both legs, made quite a pile.
 Not the thinnest shavings I've made, but adequate. I've decided I much prefer planing Beech to the Red Oak I'd been planing.